Porting the Kill Screen
Dissecting the code behind an error
The 2007 film King of Kong popularized much of the minutia of high-level arcade play. One scene showed underdog Steve Wiebe drawing Madden-esque diagrams to illustrate some of the underlying procedural patterns dictating Donkey Kong’s barrel flow. A quick left-right flick on the joystick, for instance, could send a barrel down a ladder, smoothing some of the random chaos afflicting Mario’s unending ascent.

The film also highlighted Donkey Kong’s infamous kill screen. In videogame lore, a kill screen is an impassable upper limit to play, usually due to the memory limitations of early arcade hardware or otherwise imperceptible programming bugs that typically arise for only the most skilled players. Pac-Man has one. Venturing beyond the 8-bit CPU’s ability to count levels ($FF, or 256) resulted in a fascinating split-screen: on the left half, Pac-Man’s normal playfield; on the right, a fever dream of exploded graphics.
Donkey Kong’s kill screen is less aesthetically memorable. At a certain point, Mario just halts in his path, spins, and dies. No garbled screen, just an apparent virtual suicide.
Kong’s gameplay is divided into four individual screens that together comprise a level. However, when you first start the game, a level doesn’t include a full rotation of screens. It takes a few iterations to see them all. Furthermore, Japanese and American versions of the game got different sequences. The kill screen appears on Level 22, which works out to the 117th individual screen in the U.S. version and the 85th in the Japanese. Both Don Hodges and Jeff Kulczycki provide detailed explanations for why this happens. Here’s the short version: The BONUS timer, which serves as the countdown clock for each level, is calculated by multiplying the current level number by ten and adding forty. Once the player reaches Level 22, the calculated result exceeds the maximum value of a single byte (our old friend $FF). Rather than catching the overflow and adjusting accordingly, the value wraps around and loads the BONUS with inadequate time to finish the stage. Cue the death spin.
Donkey Kong’s popularity ensured that it found its way to many home consoles of the time, beginning with the ColecoVision and ending up on Nintendo’s own Famicom/NES. Porting is a tricky process, especially bearing in mind the limitations of CPUs in the 1980s. A programmer cannot simply copy and paste the code from one machine to another. Various differences in hardware exacerbate the matter, from disparate control devices (joystick or D-pad) to the underlying CPU architecture. Seeing as arcade Kong had a Z80 interior with twice the speed of the Famicom’s 6502 core, as well as a higher sprite-per-scanline count (and a few other tricks), the port from arcade to home console proved to be a challenge.
As a result, the sources are wholly different animals. But remarkably, the kill screen survived the port. Visually, they function they same way – at a certain level, the BONUS timer depletes to an inadequate count and Mario croaks on his own accord. But underneath the hood, the kill screen triggers for an entirely different reason. In essence, during the porting process, Donkey Kong’s Famicom programmers circumvented the arcade kill screen, meanwhile creating a new one.
The first clue to their difference is the level where it occurs. Initial searches online suggested that Level 133 was the culprit, far higher than the arcade’s Level 22 death trap. However, due to some space limitations in Famicom cartridges at the time, the Famicom port did not get the full four-screen cycle. The ‘cement factory’ level is omitted, but all three remaining screens (‘girders’, ‘elevators’, ‘rivets’) play in full on all levels. Once I saw that an online consensus confirmed the NES kill screen was on Level 133, I searched for an explanation.
No such luck.
Fortunately, I’d been hunting through pditincho’s thorough Donkey Kong disassembly for a few weeks, so I figured I’d take a shot at solving the mystery myself.
My first task was to verify that the kill screen actually takes place on Level 133. Since Donkey Kong is an incredibly difficult game (though easier on the NES), there was no chance I could play the required 6+ hours to reach the kill screen on my own. Thankfully, the disassembly, emulator tools, and Donkey Kong’s built-in demo mode saved me the time. Since I’m a Mac user, my emulator choices are more limited, but I can heartily recommend Macifom, which not only has excellent accuracy and mapper support, but features debugging tools for (literally) poking around in a game while it runs. If you’re on Windows, you have more options: Nintendulator, Nestopia (also on Mac), and FCEUX, to name a few. The next section will apply only to Macifom, but the aforementioned Windows options feature similar tools.
Checking the disassembly’s variable list, I noted that the current level number was stored in a single byte located in zero page address $54. (NOTE: The dollar sign indicates hexadecimal notation, not the cost of the variable. Hex and binary representation are common in assembly languages. Follow the links if you need more explanation.) As with many programming variables, the level count starts at 0. However, onscreen, in the upper-right [L] bracket, the Level number begins at 1. In other words, if the kill screen happens at Level 133 onscreen, internally the variable will have ‘counted’ to 132. You’ll see the importance of that distinction later on.
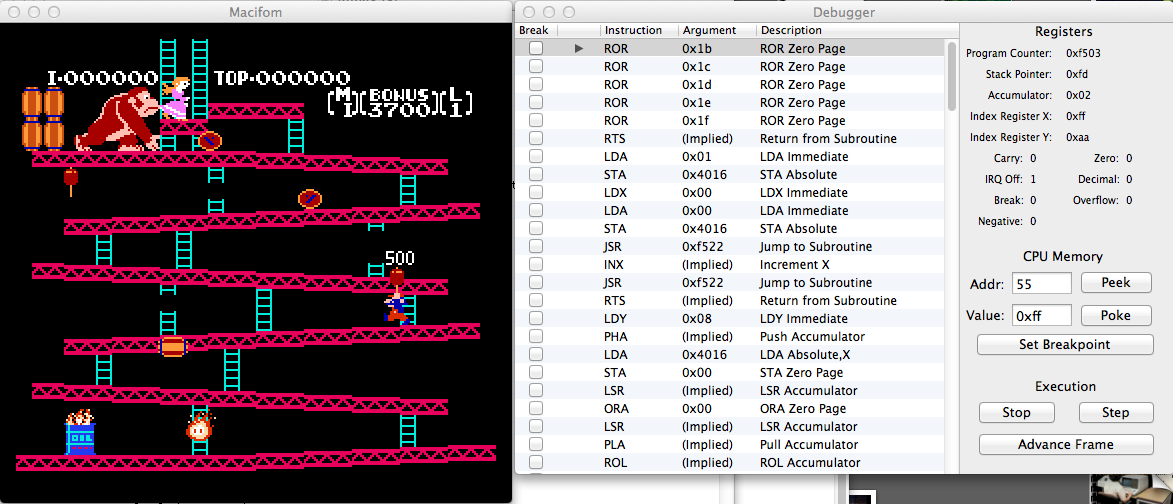
Once you launch your Donkey Kong ROM, the game rests for a few seconds at the mode selection screen, then skips to its attract mode. Here, Mario runs through a number of pre-determined motions on the opening stage, eventually dies, and the mode selection screen returns. Though this is a demo mode, the underlying logic of the game engine behaves like normal – there’s nothing special about the demo mode besides the limited number of lives, the lack of a score count, and the pre-scripted gameplay. In other words, we can manipulate a few variables while the demo plays to test the kill screen. Macifom makes this easy. Pressing CMD-D will open the debugger. This allows you to step through the game’s source instruction by instruction, check the status of various registers, advance by individual frames, and so on. We’re going to focus on the ‘CPU Memory’ section in the middle of the debugger’s right column. In the box labeled ‘Addr:’, type in 54 and click the ‘Peek’ button. Peek is an old programming term that means take a look at what value is sitting in this memory location. You should see 0x00. The ‘0x’ in front of the two zeroes is another way to notate hexadecimal numbers, just like ‘$’. In other words, the level variable is currently 0, meaning the [L] bracket should display 1.
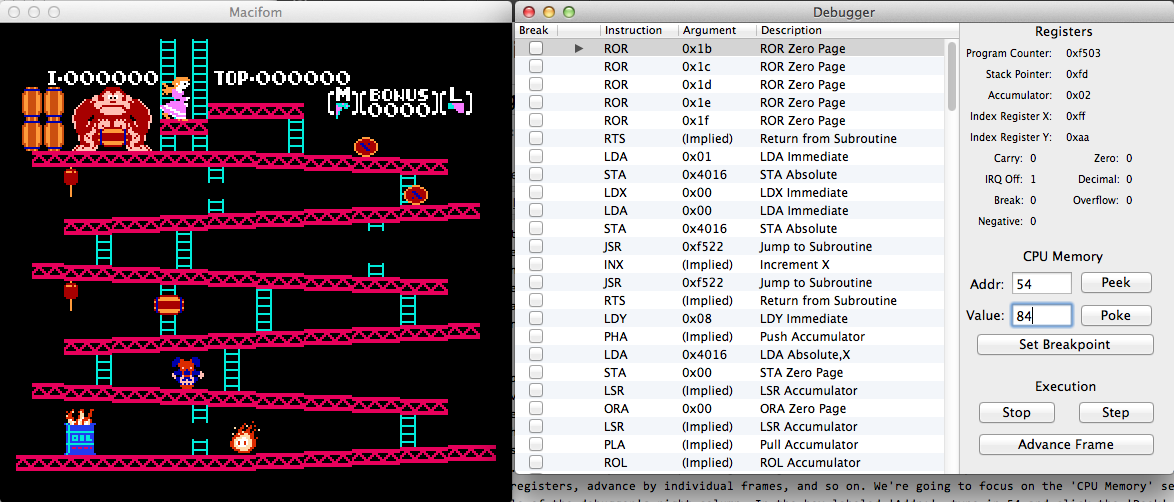
Before we manipulate this variable, let’s change another variable to make our debugging easier. Address $55 happens to store Mario’s current lives. If you Peek ’55’, you’ll see it is also 0. Let’s change that so we don’t have to watch the attract screen loop over and over. When Mario dies in the demo, we want him to keep playing without returning to the title screen. To do so, leave ’55’ in the ‘Addr:’ box, enter ‘FF’ in the ‘Value:’ box, then click the ‘POKE’ button. Poke is the invasive version of Peek – it allows us to manually insert a new value at a specified memory location. This will give us the maximum stock of Mario lives (256). If all goes well, the next time Mario dies, the girders stage should reset and Mario’s life counter (the [M] bracket) should display a nonsense character, like so:

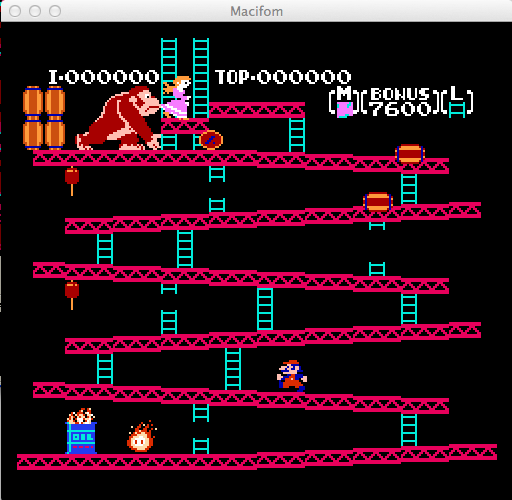
Why a nonsense character? I’ll answer that momentarily. First, let’s load level 133. Type ’54’ in the ‘Addr:’ field again, then enter ’84’ in the ‘Value:’ field. Why 84? We actually mean $84, which is the hex representation of 132. Add 1 to account for starting at count 0 and you have Level 133. If all went well, you should see the BONUS set to ‘0400’ and the Level indicator assigned to a graphic fragment. Once play begins, Mario runs a few steps then bites the dust as expected.

The reason fragments of graphics appear in the lives and level indicators has to do with the way the Famicom stores graphics data. In short, the Famicom has two pattern tables, labeled 0 and 1. The former holds all the sprites for the game, while the latter keeps track of background tiles. Though there are many exceptions, the general rule is that sprites are used for objects that move around screen, while background tiles are reserved for fixed elements. Sprites have manipulable x- and y-coordinates that allow them to be placed with pixel precision on the screen; the tradeoff is that you can only place sixty-four on the screen at once and only eight on a single scanline without causing them to flicker. Background tiles have no scanline limitations; however, they have to conform to the underlying ’tile grid’ that comprises a complete NES screen – moving them is trickier than moving sprites.
The pattern tables store all the 8×8 pieces that are combined to build the onscreen graphics. They are similar to a palette of colorful tiles you might use to create a mosaic on a bathroom floor. Pattern tables are named as such because they are used to look up the appropriate address where a needed tile is stored. Each tile in each table has an address ranging from, you guessed it, $00 to $FF, or 256 tiles apiece. Tile $00 in table #0, for instance, in the sprite for the upper left portion of Mario’s head; in table #1, the same address references the background tile for the number 0 graphic.
To make things easy for Donkey Kong’s programmers, the graphics for numbers 0-9 are stored in the first 10 slots in pattern table #1. So, for instance, if Mario currently has 3 lives, the program fetches tile $03 to display in the [M] bracket. That one-to-one correspondence saves unnecessary calculation time.

(Unfortunately, Macifom does not provide a PPU Viewer, allowing us to look at the pattern tables. However, many Windows emulators do.)
As you might have noticed, neither the lives or level indicators permit more than a single digit in their brackets. This was a practical measure – without emulator help, Mario couldn’t exceed 9 lives, nor would most normal players ever play beyond Level 9 (i.e., 27 individual screens). As a result, once the level variable exceeds 9, it continues to fetch the ‘appropriate’ tiles from the pattern table. To check this, you can Poke the value ‘A’ (hex for 10) into address $54 and the level indicator will display ‘A’. That’s not because the graphics understand hexadecimal – rather, the alphabet was stored after the digits in the pattern table. Insert a higher value, say ‘3E’ (hex for 62), and you’ll see the level indicator now displays tile $62, a piece of ladder graphic.

Hopefully, at this point you’ll understand why Level 133 contains its own graphical fragment. The program is simply fetching tile 132 from the pattern table and displaying it in the level indicator.
For the sake of completeness, I checked a number of other levels to see how they behaved, including Level 132. Every level I checked prior to Level 133 worked as expected. ‘As expected’ means that the BONUS timer was set correctly, allowing Mario enough time to complete the stage. In NES Kong, there are four possible values for the BONUS: 5000, 6000, 7000, and 8000. As they tick down, you’ll notice that the leading two digits are the only ones that change. For ease of calculation, the clock only decrements by hundreds. Or, more accurately, we can ignore the trailing two digits altogether and treat the first two digits as values from 80 to 0. The BONUS starts at 50 on Level 1 and increases by 10 until it reaches Level 4. Beyond Level 4, the BONUS is maxed at 80.
After studying the source, I noticed that there is a simple check to determine the BONUS based on the current level variable. If you don’t understand assembly language, this may be a bit trickier to comprehend, but I’ll try to describe the gist of what’s going on. The routine in question begins at $CB7E, though I’ve omitted a few instructions for clarity’s sake (marked with ellipses). The disassembly source reads:
CB7E : A4 54		ldy	$54

CB80 : C8		iny

CB81 : 20 D1 F4		jsr	$F4D1

[...]

;Set initial bonus value

;If the level number (Y) is lower than 4,

;load the bonus value from memory (C207[Y])

;Else, cap it at 8000

CB88 : A9 80		lda	#$80

CB8A : 88		dey

CB8B : C0 04		cpy	#$04

CB8D : 10 03		bpl	$CB92

CB8F : B9 07 C2		lda	$C207,y

CB92 : 85 2E		sta	$2E
So what’s going on? The first ldy instruction loads the current value at $54 (our level variable) into the y-register, adds one to the value (iny), then jumps to the subroutine at address $F4D1. That routine happens to append the tile value (now in y) to the background update list. In other words, the current level value is sent to a routine that will fetch the appropriate digit tile and place it onscreen in the [L] bracket. It’s a bit more complex than that, but for our purposes, lets keep it simple.
Once we return from the subroutine jump, the accumulator register is loaded with $80. That value should look familiar, since those are the leading digits for the maximum BONUS value. Next, y is now decremented to return it to the proper level value, not the value seen on screen (remember the count from 0!). The next part is key: The value in the y-register is then compared to 4 (cpy #$04). In assembly, the compare instruction is performed by subtracting the specified value ($04) from the value in y. After the comparison is made, a conditional branch (bpl) is executed based on whether the comparison was positive (≥0) or negative. If positive, the next instruction is skipped and the value in the accumulator ($80) is stored in $2E, the BONUS counter variable. If negative, the accumulator is loaded with the value from a small lookup table stored at $C207, which looks like the following:
;Initial timed bonus value (high byte) (5000, 6000, 7000, 8000, 9000)

C207 : 50 60		bvc	$C269

C209 : 70 80		bvs	$C18B

C20B : 90
Though the disassembler interprets these hex values as branch instructions, they’re actually just the leading digits for our BONUS counter: 50, 60, 70, 80, and – wait – 90? Sit tight. We’ll come back to that oddball number in a moment.
For most cases, this check works as expected. While the level counter is 3 or lower, the compare instruction will yield a negative value, fail the bpl branch, use the y value as an offset, and grab the correct BONUS digits. For levels 4 and above, the branch will succeed and load the max value into the BONUS. So why does Level 133 ($84) fail? Surely $84 is larger than $04, right? Shouldn’t it skip the branch as expected? By all accounts, yes, but the programmers did not account for (or ignored) one exception.
At Level 133, the y-register is loaded with $84. Once it hits the comparison instruction, the following equivalence is valid:
cmp #$04 = $84 - $04 = $80 = 128
The problem is the 128. 8-bit computers can represent unsigned values between 0 and 255, the maximum range of number storable in a single byte. But what about negative numbers? In binary math, programmers use a system called two’s complement to represent negative numbers ranging from -127 to 127. Two’s complement relies on a special pattern of bits in the number’s binary representation to determine the value’s sign. Two’s complement reserves the leftmost bit of a byte to indicate either positive (0) or negative (1) values. When Donkey Kong’s BONUS check yields $80 – whose binary form is 1000000 – the 6502 interprets the result as a negative number. In other words, when the result of the cpy instruction yields a number whose leftmost bit is 1, the 6502’s negative status flag is raised. The branch is not taken so the lookup mistakenly fetches the wrong leading digits for the BONUS timer (04), based on an erroneous offset value.
And thus the kill screen is triggered.
But what’s with that 90? It appears that Donkey Kong’s maximum BONUS value was meant to be 9000, not 8000. Besides 90’s presence in the lookup table, there is another clue – the comparison instruction checks four separate level values that will result in a negative value: levels 0, 1, 2, and 3. However, if the maximum was supposed to be 8000, only three checks would be necessary; the comparison instruction would read cpy #$03. That way Level 0 would have a BONUS of 5000, Level 1 gets 6000, Level 2 gets 7000, then all subsequent level values branch to the maximum of 8000. It appears the discrepancy between counting levels from 0 in the variable and displaying them from a count of 1 onscreen caused the programmers to muck up the comparison check. To hit a BONUS max of 9000, the code should’ve read cpy #$05. That single digit error cost players a lot of points.
Though the missing 9000 BONUS appears to be a programmer mistake, I doubt the two’s complement kill screen trigger was. It is likely the Level 133 edge case wasn’t a big concern for Donkey Kong’s designers. Few people have the skill or patience to endure the 300+ individual screens leading up to Mario’s error-induced death spin. And since there was only space in the [L] bracket to accommodate ten levels (0-9), they likely doubted that most players would ever successfully survive more than a handful of screens. Not to mention the way inappropriate tiles begin to spill into that space from the pattern tables. Long before the finest Donkey Kong players ever reached the kill screen, they would have noticed peculiar artifacts in the level display – a section of barrel or a bit of Kong’s body – indicating that they were in uncharted territory.