Stencyl Tutorial Series: Blockade (Part I)
For our introductory tutorial, we will use Stencyl to replicate the 1976 arcade game Blockade. Blockade is an early precursor to Snake and its ilk, minus the touch-an-item-to-grow mechanic. Each player controls a growing wall, or blockade, steering its leading edge around the screen in an attempt to avoid colliding with itself, the screen border, or the opposing blockade. Players score a point by surviving longer without a collision; first player to reach six points wins.
The game is exceedingly simple by modern videogame standards, but that simplicity makes it an excellent starting point for an arcade clone. With few assets to create, we can focus on tuning the game’s primary mechanics and learning a few intermediate Stencyl tricks in the meantime.
In this tutorial, you will learn:
- how to use actors, scenes, tile sets, and sound
- how to build your own movement logic
- how to use local and global attributes
- how to use Stencyl’s tile API
- how to start and finish a complete game
Tiles and Resolution
One of the most important steps when starting a game is determining your screen resolution and base tile size. Stencyl uses a tile-based graphics system, and it is particularly finicky about switching between sizes when constructing tile sets. Once you’ve settled on 32×32-pixel assets, for instance, it’s incredibly difficult to work with smaller tiles in your tileset (actor sizes are arbitrary).
It’s easy to get picky about specifics when cloning a game. We can meticulously count each tile in Blockade and precisely reproduce what we see, but generally it’s OK to make educated guesses and take creative liberties with your source material. To my eyes, what’s important for Blockade is a) its square frame and b) its ample screen area, both balanced to keep players from either colliding immediately or wandering for minutes without risk of collision.
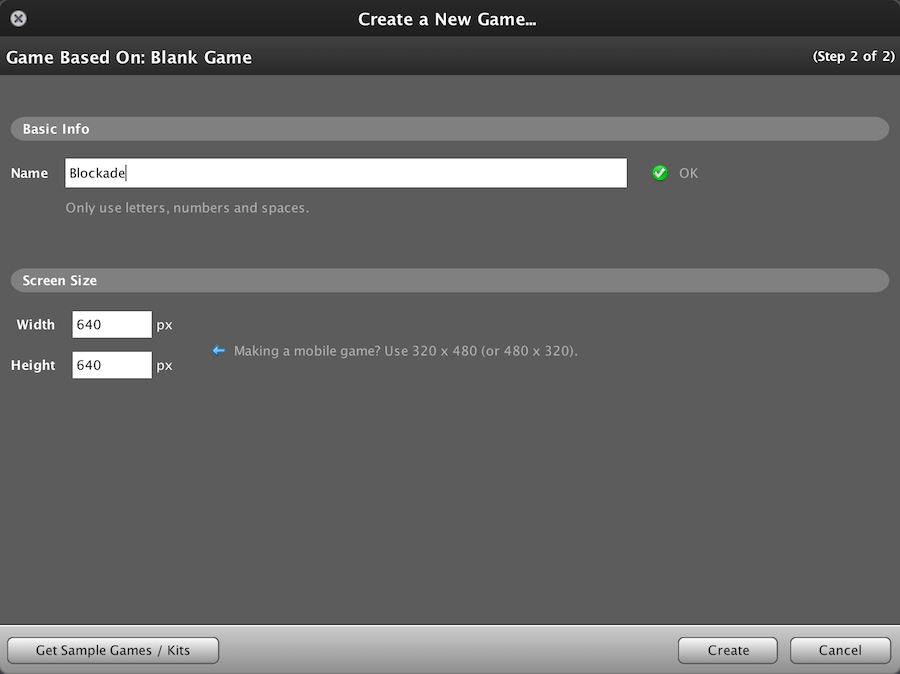
Typically I use 32×32 pixel dimensions as the smallest tile option in Stencyl games, but for Blockade, I’m opting for 16×16 because I intend for player walls to move quicker than the arcade original, and I want the game to fit on a relatively small (browser) screen. More specifically, I want our play field to measure 40×40 tiles across, giving us a total resolution of 640×640 pixels—modest by modern standards, but adequate for our purposes.
So launch Stencyl, create a blank game, name it something, and set the resolution to 640×640.
Asset Creation
In Stencyl parlance, Blockade requires minimal actors and tile sets. For the former, we primarily need two: one filled and one solid arrow (one for each player) pointing in four cardinal directions. (Stencyl has the ability to rotate actors automatically, but we’re going to pre-create each direction separately.) For visibility’s sake, I’m going to increase the arcade original’s palette and create an orange and a green arrow.
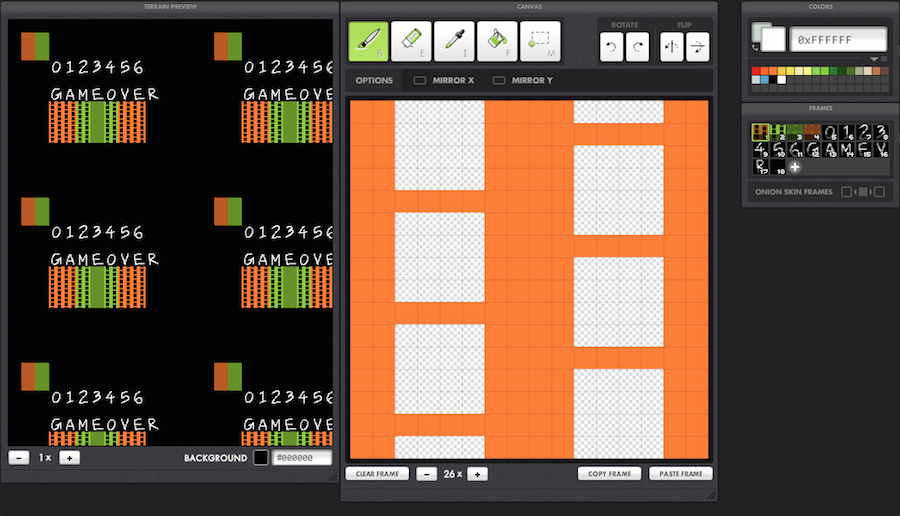
There are plenty of pixel art editors and graphics programs you can use to construct in-game graphics, so I’m not going to spend much time talking about asset workflows. For this project, I’m using Pickle for OS X, a tool that’s straightforward to use and includes a few tools (e.g. terrain creation, onion skinning) that are handy for animation and game creation. Regardless of the tool you use, you should create something that looks like the following:
Beyond the arrows, there are a few other graphical elements to account for. We need the actual blockade tiles, the digits for the score, the collision tile, and a few letters for the ‘GAME OVER’ text. Though the blockade tiles could be actors, we’re going to make them part of our tile set in order to improve performance. Stencyl can handle lots of actors in a scene, but there’s no need to use actors for the blockade tiles since they’ll never move and they’ll remain aligned to the background tile grid. And since I chose to expand Blockade‘s palette, I’ll now need orange and green versions of the blockade tiles. But for the sake of simplicity, I’m only using the vertical pattern. If you look closely at the arcade game, they have three blockade tiles: vertical, horizontal, and a connecting ‘elbow.’ This makes for a pleasing continuous wall, but it’s not strictly necessary. So let’s make the necessary background tiles:
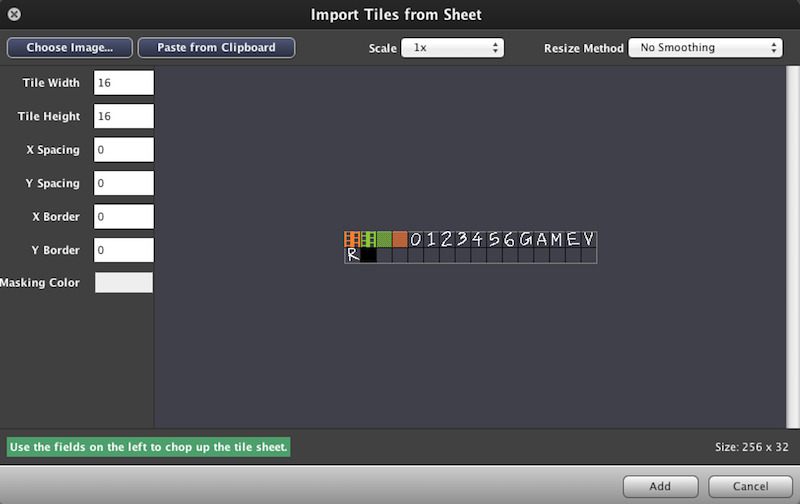
Pickle can export tiles as a single .png sheet, which is super convenient, since Stencyl can import a single .png and cut out the individual tiles for use in our game. So let’s do so.
Importing the Tile Set
On our game’s dashboard, under Resources, click Tilesets, then create a new one called ‘Tiles.’ If you’ve made a single sprite sheet like I have, you can now choose that image and change the tile width and height to our predetermined size: 16×16. Stencyl will draw border lines between each tile, so we can then add them to our game.
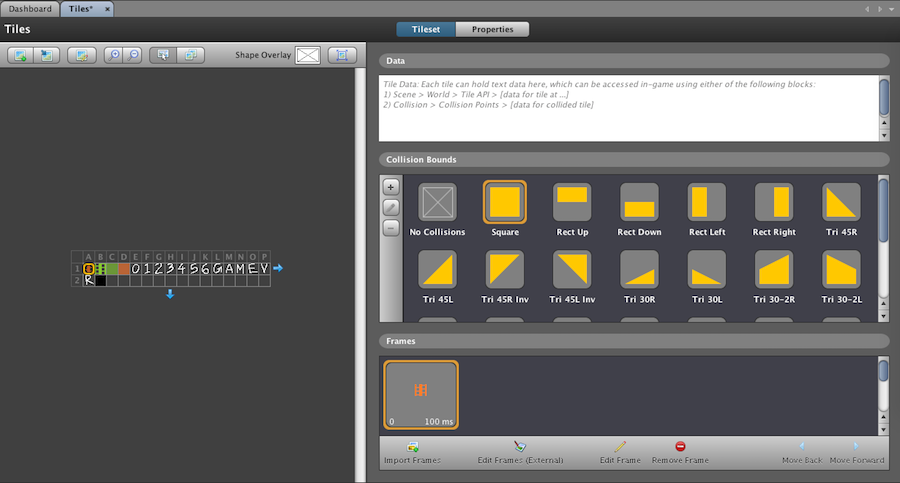
When importing tile sets, Stencyl automatically sets their collision bounds to squares. Fortunately, we can leave the default setting—none of our tiles need alternate bounds.
Making a Scene
Now that we have background tiles, we can construct our first (and only) scene. Like many arcade games from the late 70s and early 80s, Blockade‘s action takes place on a single screen. There is no scrolling, wraparound, title screen, high score screen, etc. Instead, we have a single area bordered by wall tiles.
Return to the Dashboard, click Scenes, and create a new scene called ‘Arena’ that is 40 tiles wide by 40 tiles high with a tile size of 16 pixels and a black background. In the Tiles Palette at the upper right, click the orange or green blockade tile (either is fine) and paint the tile around the scene’s outer edge (you can speed the process by clicking a corner, then shift-clicking an opposing corner to fill in all the connecting tiles).
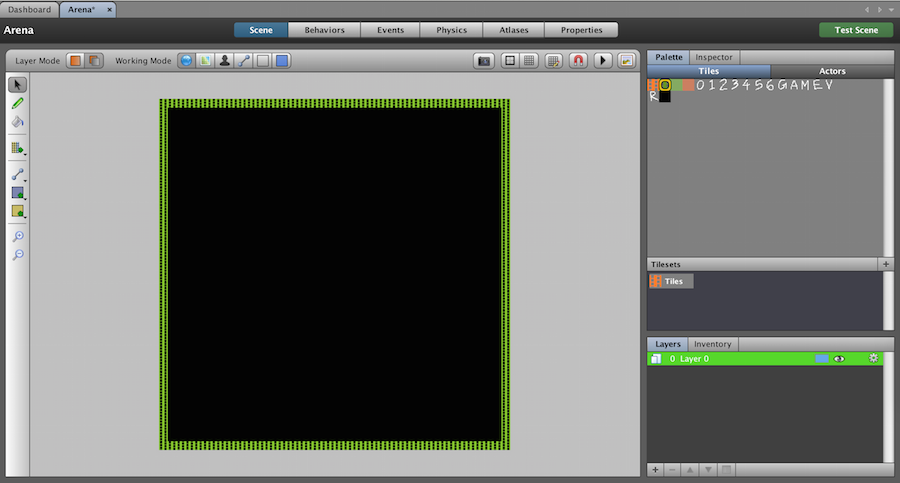
That’s all we need for our scene. Now let’s make our actors.
Setting Up Actors
Return to the Dashboard, click Actor Types, and create a new actor called P1. Click the box to add an animation, name it ‘Down,’ and click to add a frame. Select the image of your down arrow, then repeat the previous steps creating three additional one-frame animations: Up, Left, and Right.
Once the animations are complete, click the Collision tab. Collisions, as you can imagine, are necessary to detect when game objects overlap one another. To alleviate processor demands, an object’s collision box is independent of its graphical representation. In other words, Stencyl has drawn a simple square around the arrow so it only has to check a limited number of collision points each frame, rather than every single point defining the arrow’s perimeter. However, the box is a bit too large for our purposes, so let’s shrink the collision bounds to fill only the arrow’s head.
Click inside the arrow and press delete to clear the default bounding box. Then, click Add Polygon in the collision menu. Zoom your actor a few levels then drag the three collision points until they mimic the shape of the arrow’s head (but just a bit smaller). Now repeat this step for each actor animation.
Once done, click the Physics tab and set rotation and gravity to ‘No.’ We’ll be controlling rotation automatically and Blockade‘s top-down view requires no gravity. For safety’s sake, we can also set our Material to Ice (no friction or bounciness) and turn off Continuous Collisions in the Advanced menu. Finally, in the Properties tab, change P1’s Group to Players.
Groups are Stencyl’s means to categorize objects so they can interact (i.e., collide) by type. Blockade is unique in that players can collide not only with tiles, but with opposing players and themselves. As a result, we need to click the [Edit Groups…] button, select Players from the Groups list, and click the [Players] button so it’s lit green. Click OK and we’re done setting up P1’s properties.
At this point, we can click the [Add to Scene] button at the upper right, double-click Arena, place our P1 tile on the scene, and Test Game to see if our non-interactive world looks OK.
Making Actors Behave
At this point, we need to take a close look at how Blockade behaves. Best practice dictates that we should play the game to get the best feel for its movement and controls, but if you don’t have access to a 40-year old arcade game (or don’t feel like emulating it), careful observation can tell you a lot about how a game works.
The most important part of each blockade’s movement is that tiles do not slide continuously along the arena—instead, they use ‘per-tile’ movement, similar to how many RPG and roguelike actors behave. Additionally, players only control the direction of movement, not the speed. The blockades advance at a steady clip and the player changes the heading to avoid collisions. In other words, the player steers the vehicle, but has no control over the accelerator or brakes. Fortunately, this simplifies the movement behaviors quite a bit.
Stencyl comes pre-loaded with many useful behaviors, several of which are dedicated to movement. However, I find it useful to assemble many behaviors by hand, since it gives you a good feel for both Stencyl’s block-based logic system and game logic in general.
Click back to the Dashboard, choose Actor Behaviors, create a new behavior named Blockade Control, and immediately click the [Attach to Actor Type] button at top right to attach it to P1. (I emphasize this step because it can cause a lot of head-scratching frustration when a behavior is ‘free-floating.’ Immediately attaching behaviors is a good habit to get into.) Now click [Edit Behavior] so we can return to the events palette.
Before we build out the full movement events, let’s simply get P1 moving. Since our default animation is Down, let’s head in that direction. To achieve the per-tile ‘automated’ movement, we’re going to set movement on a regular timer. So click the [+ Add Event] button and choose Time -> Every N Seconds. We could type a time value directly in the little white box in our yellow timer block, but this is generally bad programming practice. Instead we should create a local attribute (or variable, in programming terminology) to store a value that we can change quickly to get the proper speed setting. To do so, click on the Attribute tab at the lower right, click [+ Add Attribute], name the attribute ‘Wait Interval,’ and choose the Number Type from the dropdown tab. Now, at the lower right, find the Default Value field and type 0.5. Next, click the Palette tab, select Attribute, and grab the small blue block that says Wait Interval. Drag it over to the white space in the yellow timer block until it clicks into place.
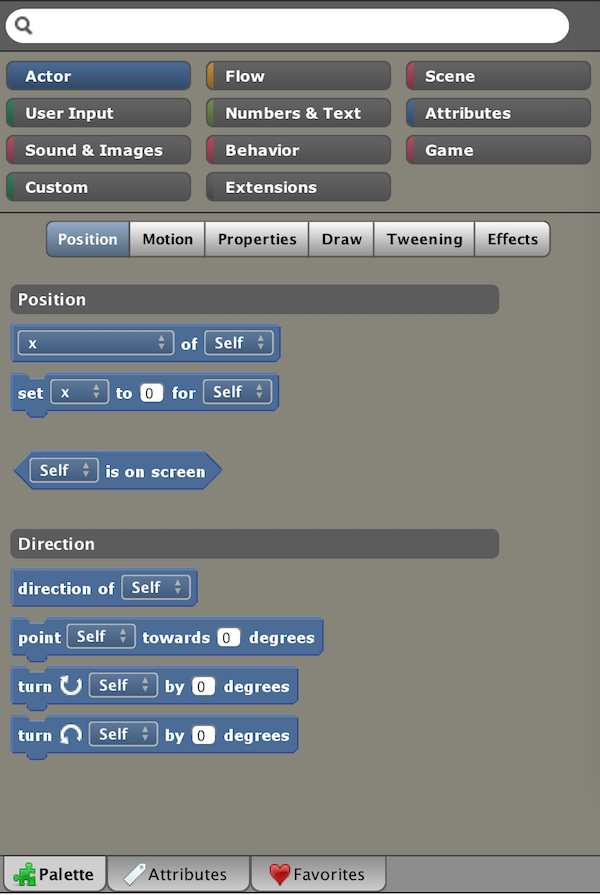
Click the Actor button in the logic Palette, drag the [set x to 0 of self] block over to the yellow timer block and let it click into place. Within the [set] block, click the x and select y instead (since we’re moving down). Now, think for a moment—what number do we want to place in the empty field? Your first guess might be to type 16, since that’s the size of the tile and thus the number of spaces we want to move each timer tick. However, if we do so, we’ll simply be resetting P1’s y coordinate to 16 over and over, i.e., it will never move. Instead, we want to update P1’s position to its current position plus its own height. We’re adding to P1’s y coordinate because Stencyl starts its coordinate system at the upper left with 0,0. Adding to x moves right while adding to y moves down, and vice-versa.
Back in the Actor tab, drag over the [x of self] block (but don’t snap it into place), click the Properties sub-tab and drag over [width of self], then click Numbers & Text and drag over the [0 + 0] block. Change [x of self] to [y of self] and [width of self] to [height of self]. Drag the two blue blocks into the addition block, then drag that block into the [set] block. Your complete logic should look something like this:
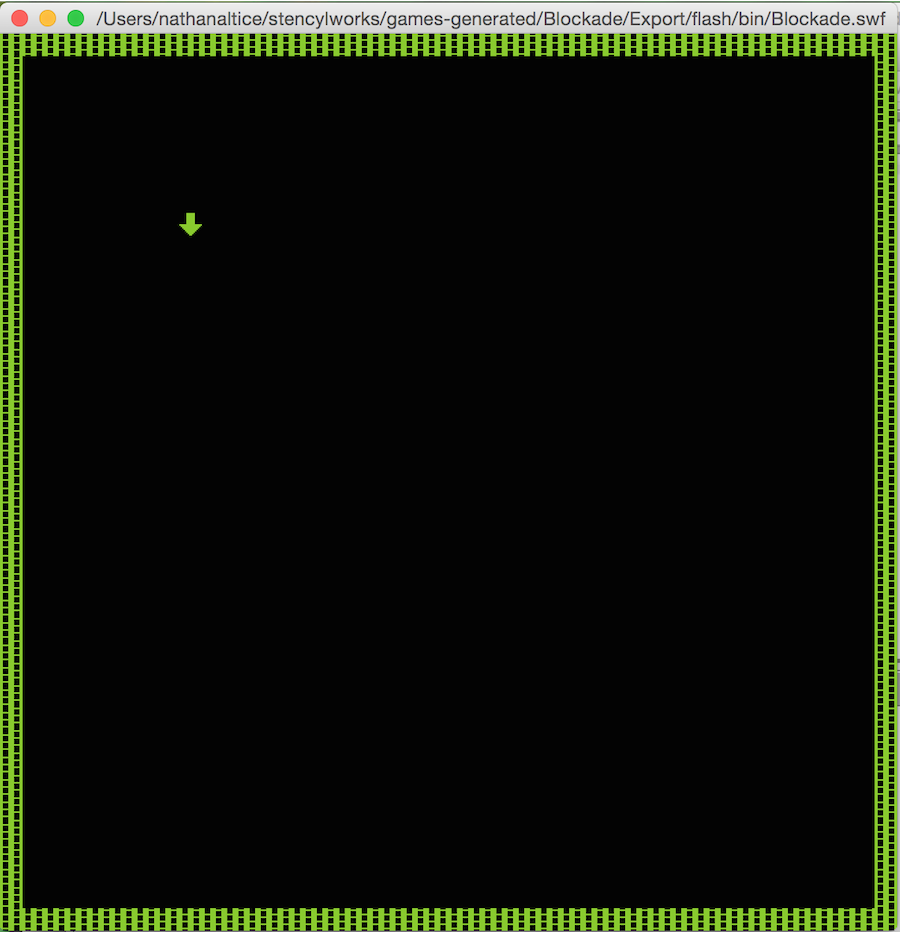
Test your game. If assembled properly, your logic should drive the P1 blockade down 16 pixels every half a second. Nothing fancy, but a start.
Taking Control
In order to make our blockade steer properly, we’re going to need to ‘poll’ for player input. Polling means that our program checks each frame to see if a particular key is pressed and, if so, acts accordingly. Sensibly, Stencyl provides a once-per-frame event that we can find by clicking [+ Add Event], Basics, When Updating. Stencyl creates a yellow block labeled ‘always,’ but that’s a bit of a misnomer—using a baseline of 60 frames per second, we know that this event polls once every 1/60th of a second.
Our control routine needs to check for four cardinal directions, so we’re going to use four separate attributes to store those directions. Using the attributes tab, create four separate Number attributes called Right, Down, Left, and Up, then assign these values respectively: 0, 90, 180, 270. These specific numbers aren’t strictly necessary, but we’re assigning them to the four cardinal points of a circle (using degrees) to help their values feel less arbitrary. 0-3 would work equally well, but they have less meaning in our game and consequently make them harder to remember. Finally, add a fifth hidden Number attribute called Direction and assign it to 0. This will be the attribute that stores our current direction as it changes and thus will steer our blockade.
Now that we have variables to store directions, we need four separate if blocks to check for keyboard input. From the Flow tab of the Palette, drag over an if block and click it into place. If blocks check whether a condition is true or false, and Stencyl represents conditions with green blocks that are pointed at either end. Click User Input and drag the
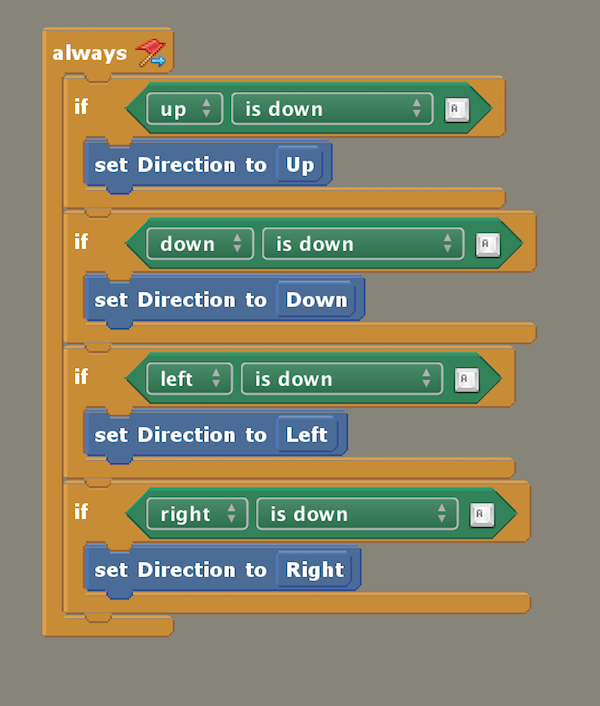
Before we place an actual value inside the Direction setter, let’s save ourselves some time and copy the if block three times, i.e., one copy for each remaining direction. While holding the option key, drag the if block downward. If all goes well, a duplicate block will appear below your mouse which you can then snap into place below the original. Once you have four blocks, be sure to change the direction box for each duplicate so they read up, down, left, and right. Then return to the Palette, choose the Getter sub-tab in Attributes, and drag the direction that corresponds to each key press into the Direction setter blocks.
Keep in mind that we have not created direct blockade control. Instead, each frame we’re polling for player input, and if one of four keys is down during that frame, we update an attribute called Direction with one of four numbers: 0, 90, 180, or 270. To make something happen, we need to return once again to our Every N Seconds event.
Changing Directions
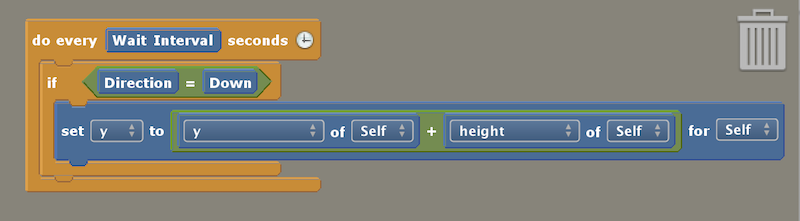
Previously we created the logic to push our blockade down every Wait Increment seconds by manipulating its y-position. Now we want to update that behavior by checking to see if Direction equals any of our directions. First things first, click our [set y to y of self…] block and hold the mouse button until it pops out of the timer block. Now drag an if block into its previous position, then drag the [set] block into the if block. In the condition field, use the
Test the game. Notice that the blockade is stationary. Press down. The blockade begins ratcheting downward. And because we used an attribute to store Direction and update that value indirectly, when we release down, the blockade continues to move—exactly as it would in the arcade version. Of course, right now, pressing any other direction halts movement, but we’re on the right track.
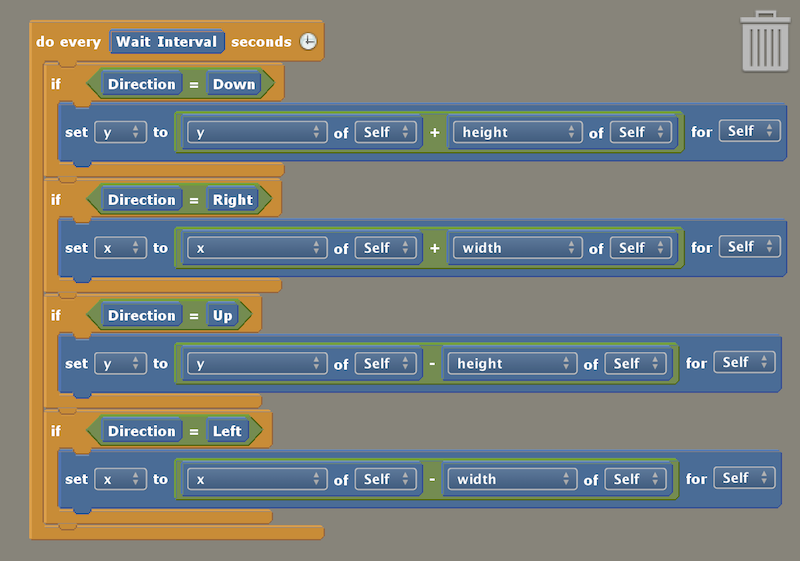
Return to the Blockade Control behavior and drag down three copies of the if statement. Though we can reuse some elements, we do need to make several modifications before our movement events will operate properly. First, be sure to replace all the equality conditions with the proper directions. You can do so by simply dragging the current attribute out of the equality block, dropping it in the trash can at the upper right, then dragging the correct attribute into place. For our East condition, make sure to change the [set] block to set x, x of Self, and width of Self since the blockade is moving along the x-axis. Likewise for West. But most importantly, make sure to swap the addition blocks in the North and West [set] blocks for subtraction. Failing to do so will result in some funky movements.
Your final logic block should look like this:
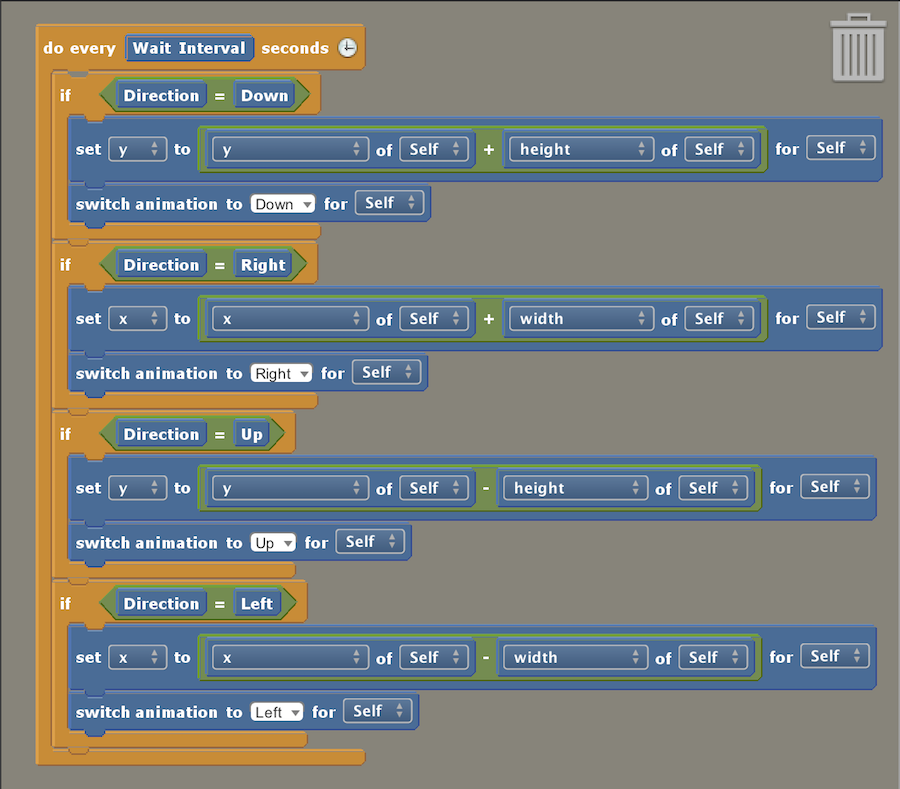
Test the game to ensure movement is functioning as expected. If so, you’ll notice that our arrow initially moves right and remains pointing downward no matter which direction we input. To fix the former issue, click on the Attributes tab and click Direction. Change its Default Value to 90 to ensure it moves down when the game begins. To fix our animations, return to the Palette and type ‘switch’ into the search bar. Drag the [switch animation…] block under our first [set] block and click it into place.
Notice that while the [switch] block is in the Palette, its field contains the text anim attribute, which stands for ‘animation attribute.’ This isn’t an attribute that we create in the Palette; animation attributes are the names we (hopefully) provided when creating animation frames for our blockade actors, and this is why it’s good practice to name them consistently and accurately. In the logic block, click the field inside the [switch] block and type Down, being sure to match the spelling and case you used earlier when naming your animation. Copy the switch block for each if condition and label each field with the corresponding direction.
Test the game. Movement is now complete.
That’s It For Now…
We don’t have much of a game yet, but we have a good foundation. Our graphics, structure, and basic movement logic is in place. In the next tutorial, we’ll dabble with Stencyl’s Tile API, build the collision logic, and add a second player. Until then, follow me on Twitter for more tutorial updates.
Finally, big thanks to my student Zach Hernandez for using this game as the basis for his first Stencyl project and inspiring my own remake.