The Legend of Zelda Cold Run: Final Session
Wherein I defeat Ganon and restore peace to Hyrule
Level-9 is the culmination of all prior level designs—the meta-dungeon, if you will. (The game cues you to its special status audibly; Level-9 is the only dungeon to get a unique soundtrack.) It took me over an hour to complete, so in lieu of turn-by-turn directions, I’ll recap the design highlights.
There are fifty-four mapped rooms, by my count, plus a few more hidden rooms and subterranean passageways. That’s nearly half the size of the entire overworld. Miyamoto and team were not playing around. Consequently, Level-9 is the first that I mapped as I played. I can’t imagine navigating purposefully without doing so. The dungeon relies heavily on passageways that tunnel across the length of the map, disorienting you in the process. There are also at least three pernicious looping structures that lead Link through a series of difficult rooms only to end up back where he started, likely with fewer hearts and bombs.
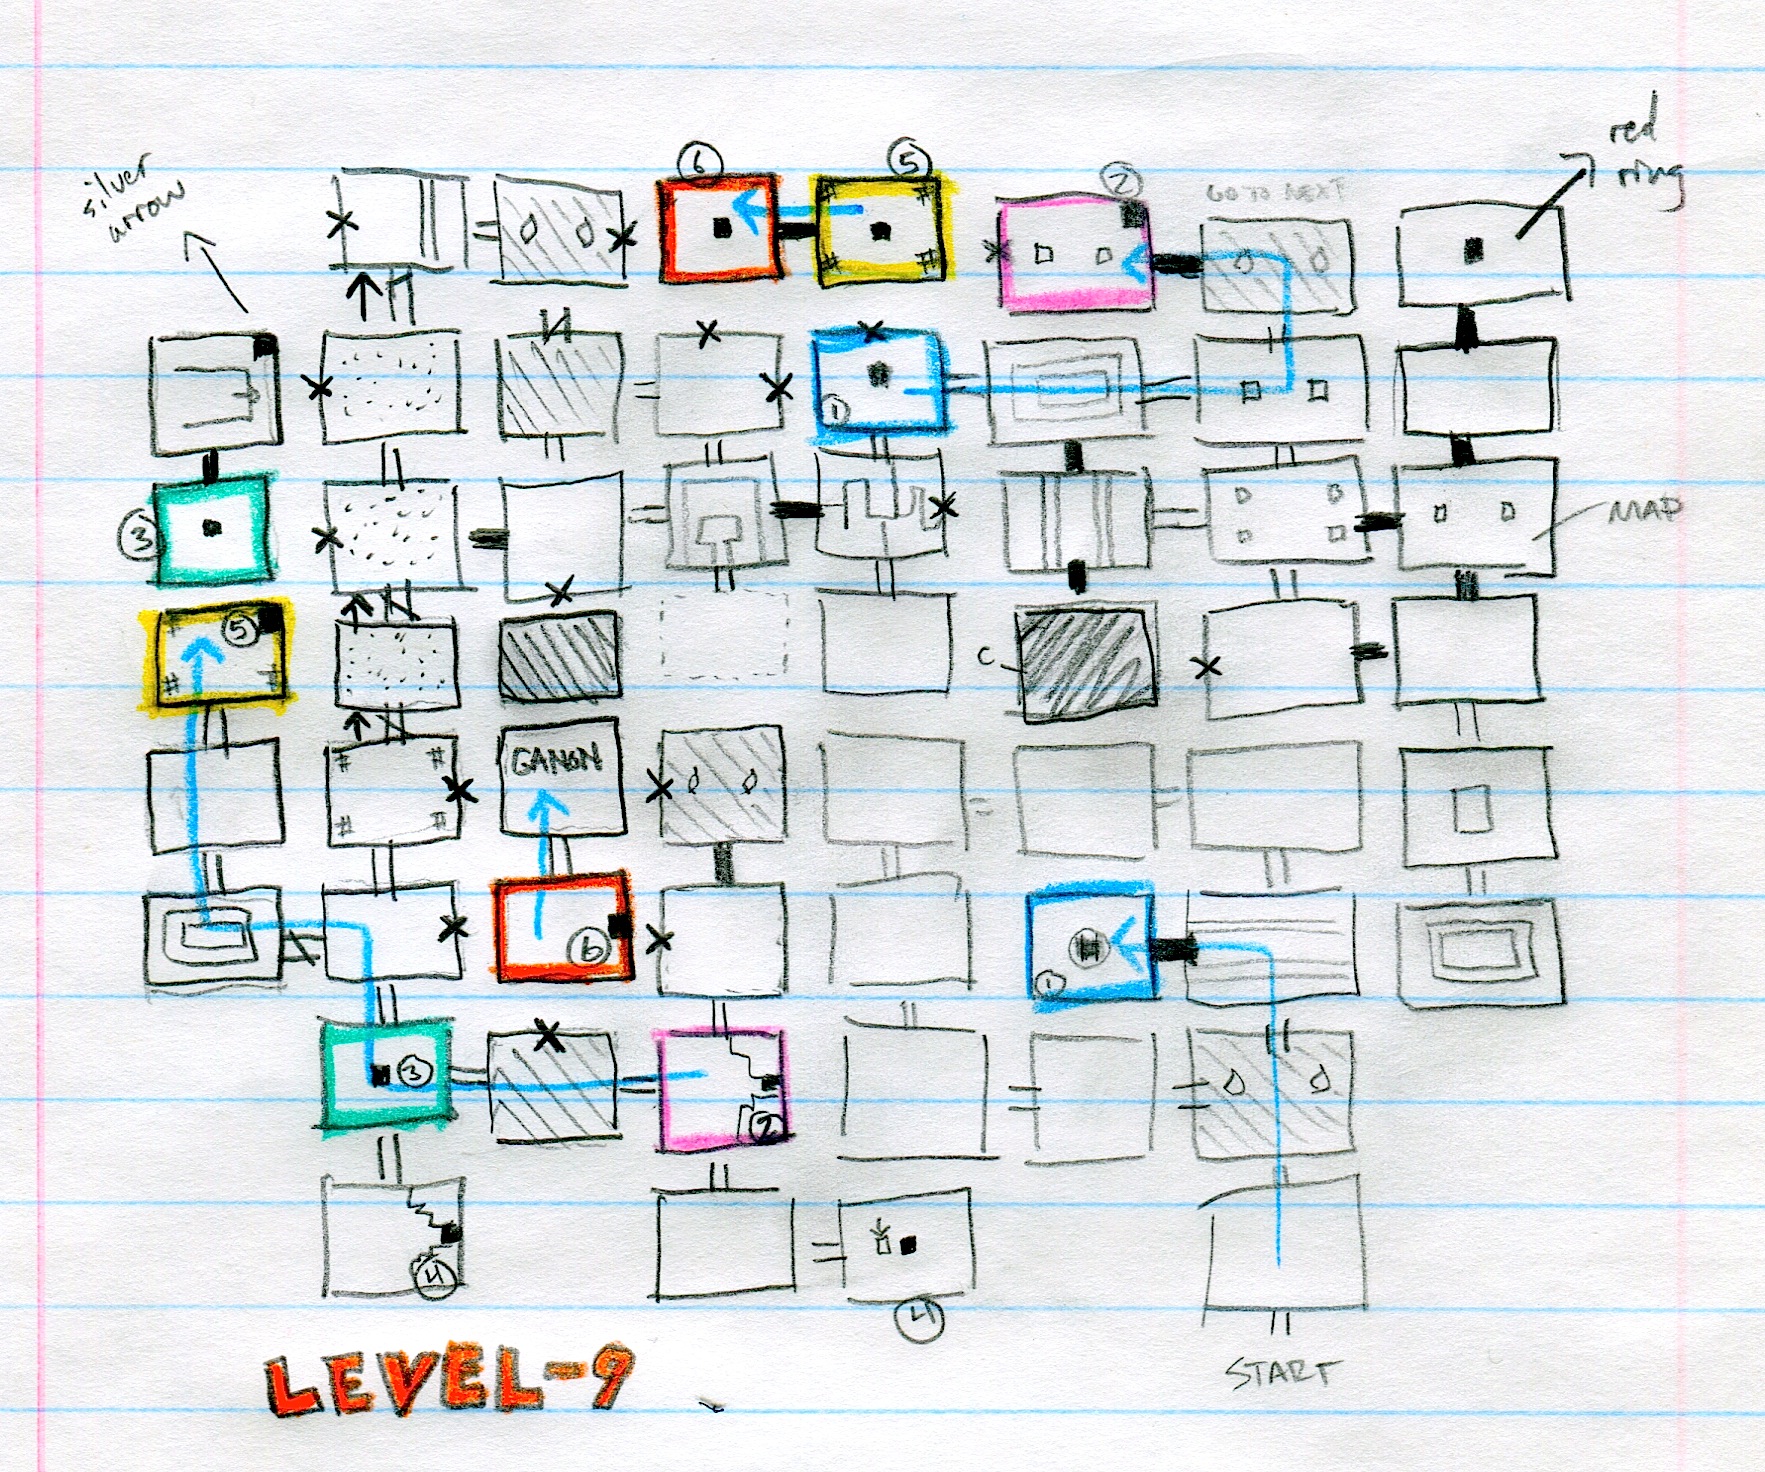
One such loop relies on a cunning trap that I can’t recall from earlier dungeons: one-way shutters. Normally, clearing a room of monsters opens any shuttered portals, but Level-9 has three rooms near the western edge that are one-way trips (you can see my arrow notations above). The portals make diegetic sense—they are placed directly adjacent to Ganon’s chamber and Princess Zelda, so at the moment you are nearest to the final battle, you are whisked northeast and forced to fight your way back to an underground passage. It’s devious but smart.
Bombs and keys are also a necessity. I notated fourteen bombed passages (with x’s) on my homemade map and probably spent double searching for hidden doorways. Thankfully, at this point, I had the master key, so locked doors were no problem. But woe to the player who had missed that item. Locked doors abound and there are few keys stashed within. I didn’t bother collecting these extraneous items, since they were commonly guarded by Wizzrobes.
Level-9’s enemy distribution is its strangest feature—enemy variety is low. The toughest rooms repeat the most frustrating layout of The-Level-That-Shall-Not-Be-Spoken: orange and blue Wizzrobes, shield-gobbling Like Likes, and sword-debilitating Wisps.
With full hearts and the blue ring, the distribution is manageable. The orange Wizzrobes are the priority—they apparate along Link’s cardinal vertices and deal the most damage. Luckily, with the master sword, they die in a single hit (and commonly drop hearts). Blue Wizzrobes teleport erratically, but only tend to barrage you when you share their horizontal plane. But when they do, they make a beeline for your position, volleying spells at a rapid rate. I’ve lost more lives to those bastards than any other enemy. I usually kept my red candle equipped to handle Like Likes and Wisps. When the latter inevitably bump you and momentarily disable your sword, the candle acts as a handy alternate—albeit weak—weapon, especially for crowd control. Partly for the sake of minimizing inventory switches (one of the game’s [the series’?] weak points) and handling darkened rooms, I used the red candle for most battles, even to clear swarms of Keese.
Another enemy annoyance is the Patra, who has a swarm of circling drones surrounding its central eye. The drones expand and contract in erratic patterns that make them difficult to strike. Considering the NES’s limited computational powers, these patterns are strikingly sophisticated. At least visually, Patra’s drones exhibit the most mathematically complex behavior of any enemy. Frustration-wise, I HATE THEM.
The level also contains two items, one optional and the other required. The former is the red ring, which cuts damage to a quarter. Thanks to my unfortunate spelunking, I left the ring until moments before I faced Ganon. I had left one northeast room unbombed; naturally it was the one hiding the passage to the ring. It’s a shame the ring doesn’t appear sooner in the game. It makes the Wizzrobe rooms tolerable and Link’s palette change looks killer. RED TUNIC.
The silver arrows are stashed in the room directly mirror opposite of the red ring. I didn’t stumble upon an in-game clue that these were necessary to slay Ganon. It’s just another part of Zelda lore I’d internalized over the years, so I wonder how long it might have taken me to figure out the sword/arrow combo without any guidance. One great bit of level design, one you likely wouldn’t see in contemporary videogames, is that the route to Ganon does not pick up the silver arrows along the way. In other words, it’s possible to reach Ganon without the weapon necessary to defeat him. In fact, this happened to me. Although I knew I lacked the proper weaponry, I wanted to get a feel for Ganon’s attack patterns and verify his map position. This proved prudent—I discovered that you have to strike him with your sword three times before he changes color and pauses for the final arrow shot. Some might scoff that the final boss is largely invisible during the fight, but I like his invisibility schtick—though it was likely a technical concession meant to keep his animation frames at a minimum. Nonetheless, when he appeared, Ganon was impressively sprited. Definitely a nice culmination of previous boss designs.
By the time I had picked up the silver arrows, I already knew the route to Ganon, so my second encounter was much easier. My only hiccup was forgetting to quaff my red potion prior to the fight. I ran in with three hearts and nearly died before I had the chance to switch items. Once I had the full sixteen loaded, Ganon went down with three swings and a single arrow. Once dead, he dissolved into a satisfying pile of ash.
Zelda awaited me in the adjacent chamber, i.e., the left ‘eye’ of the skull map. The surrounding flames were a nice touch. I had to swipe them with my sword to make them shift to the side. Once I reunited with Zelda, we held two (?) Triforces aloft, a short congratulatory message appeared, and the credits rolled. Unfortunately, my capture software chose to bork this one time, so I lost the final thirty minutes of Level-9 video. You will just have to trust me when I say, SESSION COMPLETE.
STATS
Death count: 34
Triforce count: ZELDA GET!
Session time: 01:45
Total play time: 07:25